Sizing
Finding your size
Step-by-step guide to perfectly fitting nails.
Two ways to size
Use the classic tape & ruler method below, or jump to the quick Quarter or Dime method.
Method 1 — Tape & ruler
Measure your nails
You'll need tape and a ruler. Start with your thumb and work to your pinky — measure the widest part of each nail and write down all 5 numbers.
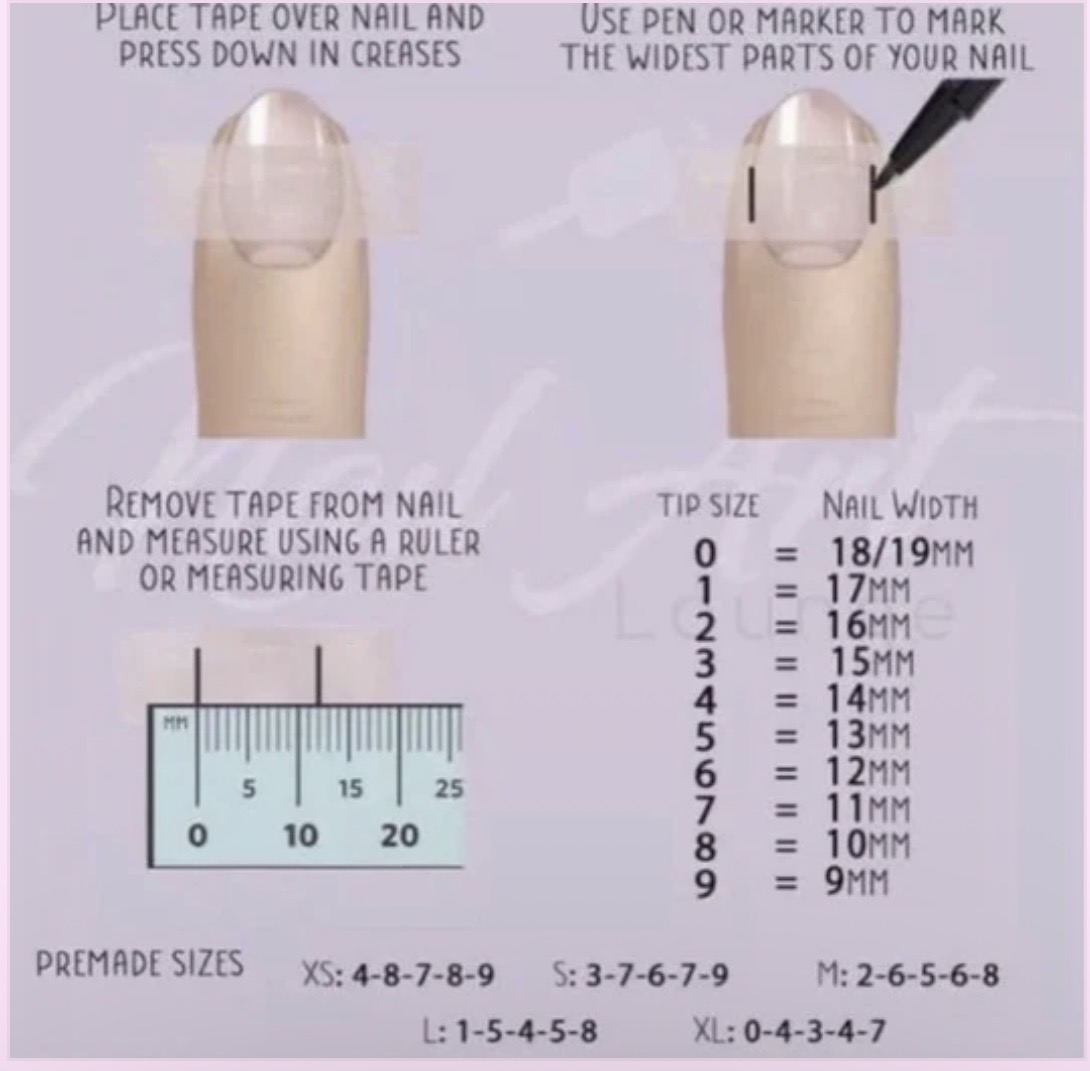
Place tape across your nail and press down in the creases
Mark the widest parts of your nail with a pen or marker
Remove the tape and measure with a ruler or measuring tape
Write down your measurements thumb → pinky (e.g. 18-17-16-15-14)
Find your size numbers
Match your mm measurements to a tip size.
0
18–19mm
1
17mm
2
16mm
3
15mm
4
14mm
5
13mm
6
12mm
7
11mm
8
10mm
9
9mm
Use a preset (optional)
If measuring isn't your thing, try one of these common combos.
- XS4 - 8 - 7 - 8 - 9
- S3 - 7 - 6 - 7 - 9
- M2 - 6 - 5 - 6 - 8
- L1 - 5 - 4 - 5 - 8
- XL0 - 4 - 3 - 4 - 7
Sizes run thumb → index → middle → ring → pinky. If your measurements don't match a preset exactly, just include your custom mm in the order notes.
Choose your shape & length
Pick the shape that suits your style. Longer lengths add $5–$10.
Square
Classic, clean look. Best for everyday wear.
Coffin
Tapered, elegant. Ballerina-style shape.
Stiletto
Pointed, dramatic. Extra bold statement.
Tapered Duck
Flared tip with tapered base. Bold, trendy statement.
Short — Just past fingertip. Easy to manage.
Medium — Classic length. Comfortable daily wear.
Long / XL — Noticeable length. Eye-catching.
2XL–5XL — Extra dramatic. Custom request recommended.
Method 2 — Quarter or Dime
Press-on nail sizing guide: Quarter or Dime method
Finding your perfect press-on nail size from home is simple with the Quarter or Dime method. This quick technique helps me accurately match your nail sizes for a comfortable, natural-looking fit — no sizing kit required.
What you'll need
- A quarter or dime
- Your natural nails
- Good lighting
- A phone (for photos)
How it works
Step 1: Position the coin
Place a quarter or dime flat across your nail, aligning it with the widest part of your nail bed. Make sure the coin is centered and not tilted.
Step 2: Compare the width
Observe how your nail compares to the coin:
- Narrower than the coin → Smaller nail sizes
- About the same width → Medium nail sizes
- Wider than the coin → Larger nail sizes
Step 3: Take a photo
For best accuracy, take a clear photo of each nail with the coin in place. This allows me to visually assess and confirm your sizing.
Step 4: Repeat for all nails
Each nail can vary slightly in size, so be sure to measure all 10 nails individually.
Pro tips for the best fit
- Measure at the widest point of each nail
- Let the coin rest naturally — avoid pressing down too hard
- If you're unsure between sizes, size up — you can always file for a more precise fit
Disclaimer: some customers may be asked to use this method after completing their order.
If you have any questions or need help confirming your sizes, feel free to reach out — I'm here to help you get the perfect fit every time.
Not sure about your size?
All custom orders are made to fit. DM your exact measurements and I'll size them perfectly for you — no extra charge for custom sizing.
Start your order →